 Tools Required:
- Philips #1 Screwdriver
- Metric hex/allen key set (small ratchet or t-handle preferred)
- SAE hex/allen key set (1/16" and 5/32" sizes included)
- WD-40 or a liquid lubricant
- 3(+)x M5-0.5 x 16mm Grade 8stainless steel screws
Parts Required:
| Qty | Part Number | Description |
| 1 | 446-00167-GRP | Includes all parts listed below: |
| 1 | 446-00167 | IMPELLER, MAIN BLOWER, SR! |
| 4 | 457-00695 | SPACER, 13MM OD, 18MM LENGTH, 18-8 SS, M6 |
| 4 | 457-00696 | SCREW, M6-1.0 X 30MM, 18-8 SS, HH |
| 3 | 457-00697 | SCREW, M5-0.8 X 16MM, ALLOY, SHC |
Process:
- Remove the right side panel from the main body of the Roaster.
- Remove the passive cooling fan if it's blocking your access.
- Locate the Main Blower. Disconnect the 3 connectors: main power, control, and ground wires. You may cut the ground wire add a splice during reassembly as needed.

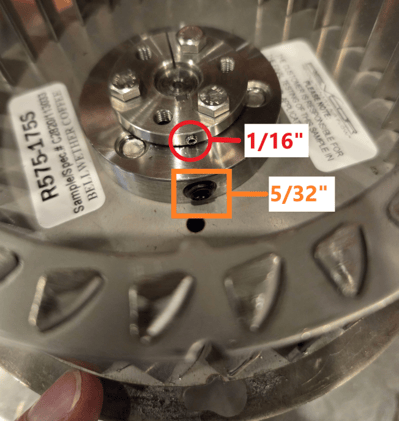
- To remove the Main Blower from the duct, loosen the slotted allen screws circled in red in the image below (this is a view up from the bottom of the motor). Once loose twist the Main Blower to the right to drop it down.


- Carefully remove the three screws securing the taper lock to the motor shaft. These screws take a lot of heat and are easy to strip out. Take your time and use WD-40 as needed.


- Loosen/remove the lock screw that secures the Taper Lock to the key on the motor shaft.

- Now we will remove the Taper Lock from the Blower Motor shaft. Lubricate the other set of holes on the top of the Taper Lock that are threaded (In the image below, the red circles are the screws we removed in Step 5 and the blue circles are the set of threaded holes that we are lubricating.) Take 3xM5-0.5 pitch screws and start threading them into these holes taking great care not to strip or crossthread. Move in a circular pattern and slowly and gently tighten the screws down until the Taper Lock releases from the motor shaft.


- If swapping to the new-style Blower Impeller, we need to add the shorter standoffs and screws. Remove the bolts (circled in red below) that secure the plate to the Blower to access the standoffs (red squares below). Replace with shorter standoffs and re-secure the plate with shorter bolts (Part numbers 457-00695 and 457-00696 respectively).


- Attach the new-style impeller to the motor shaft. Slide the impeller over the key and down the motor shaft. The lip of the impeller should rest slightly above the edge of the motor shaft as below but still have engagement from the lockscrew as indicated by the green arrow below. Tighten the lockscrew in this position and then place then coat the (3) new M5 bolts with antisieze and then place in the location as indicated below by the blue circles. Tighten them down in a circular fashion to secure to 2.5NM torque spec. You will likely have to continue in a circle multiple times around at that torque.

- Your Blower Motor is now ready to be replaced back into the Roaster. Make sure that your orientation is correct. The notch should be positioned relative to the duct as indicated by the arrow below. The label on the motor should be facing directly out toward the side.


11. Replace the Blower Motor into the assembly by lifting it up into the unit. Rotate the motor to engage the slotted screw holes. Tighten the screws and reattach the electrical connectors. Your blower is now ready to be tested.