 Tools Required:
- Philips #1 Screwdriver
- Metric Allen/Hex Key Set
- Ziptie (Optional)
Process:
Preparing the Bulk Collector:
- Uncrate the Roaster, Autoloader, and Bulk Collector. (LINK)

- Pull out both of the Latch Handles and remove the Chaff Can/Water Bottle Tray and remove the Bean Bucket. Remove all of the items stored in the Bean Bucket for shipping: the Boot Sleeve, the Wheel Chock, the Autobucket etc. Set these items aside for later.

- Remove the Side Panels of the Bulk Collector by unfastening the Black Screws in the locations shown a Phillips #1 Screwdriver. Lift the Side Panels up first, then out, away from the Base. Continue by removing the Rear Panel in the same fashion


Preparing The Roaster
- Remove the packaging from around the Base of the Shop Roaster (if present) to expose the Lift Handles stored there. Setup the four lift handles by removing them from the base of the unit, removing the pin from the slot, inserting the handle into the hole, aligning the holes, and then inserting the pin to secure the handle to the roaster as in images below.


- The next steps require a minimum of four people! Five would be recommended. At least three of these people need to be comfortable lifting about 100 pounds of weight each. Roll the prepared Bulk Collector in front of the Shop Roaster, leaving about 3 ft of space between the two.

- Identify the larger round holes in the corners of the Top Plate of the Bulk Collector. These are the locations where the “feet” on the underside of the Shop Roaster should be placed when lowering the machine onto the Bulk Collector. You should be able to feel the Roaster “lock” in place when these feet find the holes.

- Position your Lifters so that the strongest two are holding the Lift Handles at the rear of the Base;
- If you are a Lifting Team of three, the third person should be holding the Lift Handle on the right side of the Shop Roaster, as shown above. The left side Lifter in this scenario will have to hold both Lift Handles on that left side.
- If you are a Lifting Team of four, each person should have their own Lifting Handle, but it is still recommended to have the strongest Lifters at the rear of the machine.

- CAREFULLY lift the Shop Roaster up and have the non-lifting member of your Team roll the Bulk Collector underneath the Shop Roaster. Lower the Shop Roaster onto the Bulk Collector in the orientation shown, and adjust it until you feel the feet of the Roaster “lock” into place in the openings described in Step 3.

- Identify the Screw holes located below each Lift Handle, on the underside of the Bulk Collector’s Top Plate. Use qty. 4, 457-00667 SCREW, M6 X 8MM SHC to secure the Shop Roaster to the Bulk Collector in each corner and torque these Screws to 10 Nm.

- Return the Lift Handles and Retaining Pins to their storage locations in the sides of the Base of the Shop Roaster.

- Make your way to the rear of the Bulk Collector, just under the Power Switch. Feed the wire for the Optical Sensor on the Bean Bucket up through the opening shown above by the white arrow, into the cavity containing the wired connectors. Connect to the Red-White-Black wire. Then, feed the wire for the Optical Sensor on the Chaff Can through the same hole and connect to the Green-Blue-Brown wire. For this wire, we have to be sure that it is clear of the Water Spout, and that the dripping water will not run down the wire and disrupt the sensor. Use some Aluminum Tape or a zip tie to secure the wire route, avoiding the Water Spout.


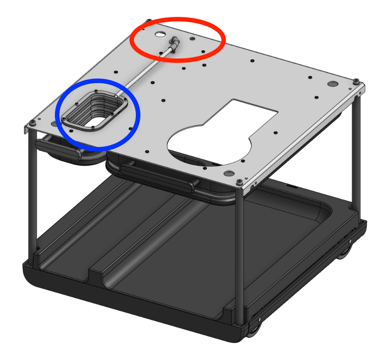
- Ensure that the Boot Connector is present and that it has been turned counterclockwise as far as it can turn (without forcing it). The location feature should point straight forward from the Roaster when the Connector is in its proper position.


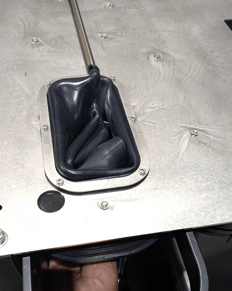
- Remove the silicone cover and unfold the Transition Boot and expose the large, round opening on top. Take the Boot Sleeve and carefully slide it into the Transition Boot in the orientation shown, with the ridge at the upper part of the Sleeve. It should be inserted up to the ridge, as shown.


- Wrap the Transition Boot’s upper seal around the lower lip on the Boot Connector. It is recommended to start at the rear and work your way forward as you wrap.


- Unlock the Collector Bucket and remove from the Roaster. Reach upward from below and push out the metal plate that is between.


- Remove the magnetic cover by pulling it upward to remove. Find the connector that is present in the gap at the center of the roaster. If it's not easy to find, trace the wire from J17 on the main board and fish it through. Connect it to the Autobucket that we set aside from the Bulk Collector. Push the entire assembly back until the magnet locks into place. Use the lever lock to secure the Autobucket into the machine.


Preparing The Autoloader
- Remove the Auto Loader from its shipping container. Remove both Side Panels with a Phillips Screwdriver and remove the Cover Top Lid by lifting it up and out. Remove the Rear Panel using a 4mm Allen Wrench or appropriately sized bit.


- Remove the Side Panels from the Roaster using a Philips Screwdriver. There are two Allen screws going upward into the top cover on each side . Remove these four screws and remove the top panel from the Roaster.


- With a total of two Lifters, one on either side of the Auto Loader, lift the Auto Load up and gently place it down over top of the Shop Roaster in the orientation shown below. Adjust the position of the Auto Loader until it is sitting as flat and flush to the cosmetic trim and panels as possible.

- From each side of the Autoloader cabinet, we will need to remove the shim and screw used to protect the Autoload Hopper from damage in transit. Remove the screw circled below in red and then pull the shim out. The shims should be disposed of, but the screws can be reused to secure the Auto Loader to the Shop Roaster at the spots indicated below. Repeat on both sides of the Autoloader to remove both shims.


- Plug the cable in the Autoload cabinet into the cutout connecting it to the roaster. If the cable is too short as below, snip any zipties and ensure that it's as long as possible to alleviate tension. If still too tight, the connector can be pushed up into the top cabinet from below.


Refitting Panels
If this is initial or first time install, we recommend continuing on and doing all testing before refitting any of the panels. Once satisfied with correct function, r efit all removed panel, containers, lids to the machine. Recommend following this order to ensure the best fit:- Rear Panel of Base Cabinet
- Side Panels of Base Cabinet
- Cover Handles
- Side Panels of Roaster
- Rear Panel of Autoloader
- Side Panels of Autoloader
- Containers and Lids
- Valence


